
Guide.md 16KB
React Native WebView Guide
This document walks you through the most common use cases for React Native WebView. It doesn’t cover the full API, but after reading it and looking at the sample code snippets you should have a good sense for how the WebView works and common patterns for using the WebView.
This guide is currently a work in progress.
Guide Index
- Basic Inline HTML
- Basic URL Source
- Loading local HTML files
- Controlling navigation state changes
- Add support for File Upload
- Multiple files upload
- Add support for File Download
- Communicating between JS and Native
- Working with custom headers, sessions, and cookies
Basic inline HTML
The simplest way to use the WebView is to simply pipe in the HTML you want to display. Note that setting an html source requires the originWhiteList property to be set to ['*'].
import React, { Component } from 'react';
import { WebView } from 'react-native-webview';

class MyInlineWeb extends Component {
  render() {
    return (
      <WebView
        originWhitelist={['*']}
        source={{ html: '<h1>This is a static HTML source!</h1>' }}
      />
    );
  }
}
Passing a new static html source will cause the WebView to rerender.
Basic URL Source
This is the most common use-case for WebView.
import React, { Component } from 'react';
import { WebView } from 'react-native-webview';

class MyWeb extends Component {
  render() {
    return (
      <WebView source={{ uri: 'https://facebook.github.io/react-native/' }} />
    );
  }
}
Loading local HTML files
Sometimes you would have bundled an HTML file along with the app and would like to load the HTML asset into your WebView. To do this on iOS, you can just import the html file like any other asset as shown below.
import React, { Component } from 'react';
import { WebView } from 'react-native-webview';

const myHtmlFile = require("./my-asset-folder/local-site.html");

class MyWeb extends Component {
  render() {
    return (
      <WebView source={myHtmlFile} />
    );
  }
}
However on Android, you need to place the HTML file inside your android project’s asset directory. For example, if local-site.html is your HTML file and you’d like to load it into the webview, you should move the file to your project’s android asset directory which is your-project/android/app/src/main/assets/. Then you can load the html file as shown in the following code block
import React, { Component } from 'react';
import { WebView } from 'react-native-webview';

class MyWeb extends Component {
  render() {
    return (
      <WebView source={{ uri: "file:///android_asset/local-site.html" }} />
    );
  }
}
Controlling navigation state changes
Sometimes you want to intercept a user tapping on a link in your webview and do something different than navigating there in the webview. Here’s some example code on how you might do that using the onNavigationStateChange function.
import React, { Component } from 'react';
import { WebView } from 'react-native-webview';

class MyWeb extends Component {
  webview = null;

  render() {
    return (
      <WebView
        ref={ref => (this.webview = ref)}
        source={{ uri: 'https://facebook.github.io/react-native/' }}
        onNavigationStateChange={this.handleWebViewNavigationStateChange}
      />
    );
  }

  handleWebViewNavigationStateChange = newNavState => {
    // newNavState looks something like this:
    // {
    //   url?: string;
    //   title?: string;
    //   loading?: boolean;
    //   canGoBack?: boolean;
    //   canGoForward?: boolean;
    // }
    const { url } = newNavState;
    if (!url) return;

    // handle certain doctypes
    if (url.includes('.pdf')) {
      this.webview.stopLoading();
      // open a modal with the PDF viewer
    }

    // one way to handle a successful form submit is via query strings
    if (url.includes('?message=success')) {
      this.webview.stopLoading();
      // maybe close this view?
    }

    // one way to handle errors is via query string
    if (url.includes('?errors=true')) {
      this.webview.stopLoading();
    }

    // redirect somewhere else
    if (url.includes('google.com')) {
      const newURL = 'https://facebook.github.io/react-native/';
      const redirectTo = 'window.location = "' + newURL + '"';
      this.webview.injectJavaScript(redirectTo);
    }
  };
}
Add support for File Upload
iOS
For iOS, all you need to do is specify the permissions in your ios/[project]/Info.plist file:
Photo capture:
<key>NSCameraUsageDescription</key>
<string>Take pictures for certain activities</string>
Gallery selection:
<key>NSPhotoLibraryUsageDescription</key>
<string>Select pictures for certain activities</string>
Video recording:
<key>NSMicrophoneUsageDescription</key>
<string>Need microphone access for recording videos</string>
Android
Add permission in AndroidManifest.xml:
<manifest ...>
  ......

  <!-- this is required only for Android 4.1-5.1 (api 16-22)  -->
  <uses-permission android:name="android.permission.WRITE_EXTERNAL_STORAGE" />

  ......
</manifest>
Camera option availability in uploading for Android
If the file input indicates that images or video is desired with accept, then the WebView will attempt to provide options to the user to use their camera to take a picture or video.
Normally, apps that do not have permission to use the camera can prompt the user to use an external app so that the requesting app has no need for permission. However, Android has made a special exception for this around the camera to reduce confusion for users. If an app can request the camera permission because it has been declared, and the user has not granted the permission, it may not fire an intent that would use the camera (MediaStore.ACTION_IMAGE_CAPTURE or MediaStore.ACTION_VIDEO_CAPTURE). In this scenario, it is up to the developer to request camera permission before a file upload directly using the camera is necessary.
Check for File Upload support, with static isFileUploadSupported()
File Upload using <input type="file" /> is not supported for Android 4.4 KitKat (see details):
import { WebView } from "react-native-webview";

WebView.isFileUploadSupported().then(res => {
  if (res === true) {
    // file upload is supported
  } else {
    // not file upload support
  }
});
Multiple Files Upload
You can control single or multiple file selection by specifing the multiple attribute on your input element:
// multiple file selection
<input type="file" multiple />

// single file selection
<input type="file" />
Add support for File Download
iOS
For iOS, all you need to do is specify the permissions in your ios/[project]/Info.plist file:
Save to gallery:
<key>NSPhotoLibraryAddUsageDescription</key>
<string>Save pictures for certain activities.</string>
Android
Add permission in AndroidManifest.xml:
<manifest ...>
  ......

  <!-- this is required to save files on Android  -->
  <uses-permission android:name="android.permission.WRITE_EXTERNAL_STORAGE" />

  ......
</manifest>
Communicating between JS and Native
You will often find yourself wanting to send messages to the web pages loaded by your webviews and also receiving messages back from those web pages.
To accomplish this, React Native WebView exposes three different options:
- React Native -> Web: The
injectedJavaScriptprop - React Native -> Web: The
injectJavaScriptmethod - Web -> React Native: The
postMessagemethod andonMessageprop
The injectedJavaScript prop
This is a script that runs immediately after the web page loads for the first time. It only runs once, even if the page is reloaded or navigated away.
import React, { Component } from 'react';
import { View } from 'react-native';
import { WebView } from 'react-native-webview';

export default class App extends Component {
  render() {
    const runFirst = `
      document.body.style.backgroundColor = 'red';
      setTimeout(function() { window.alert('hi') }, 2000);
      true; // note: this is required, or you'll sometimes get silent failures
    `;
    return (
      <View style={{ flex: 1 }}>
        <WebView
          source={{
            uri:
              'https://github.com/react-native-community/react-native-webview',
          }}
          injectedJavaScript={runFirst}
        />
      </View>
    );
  }
}
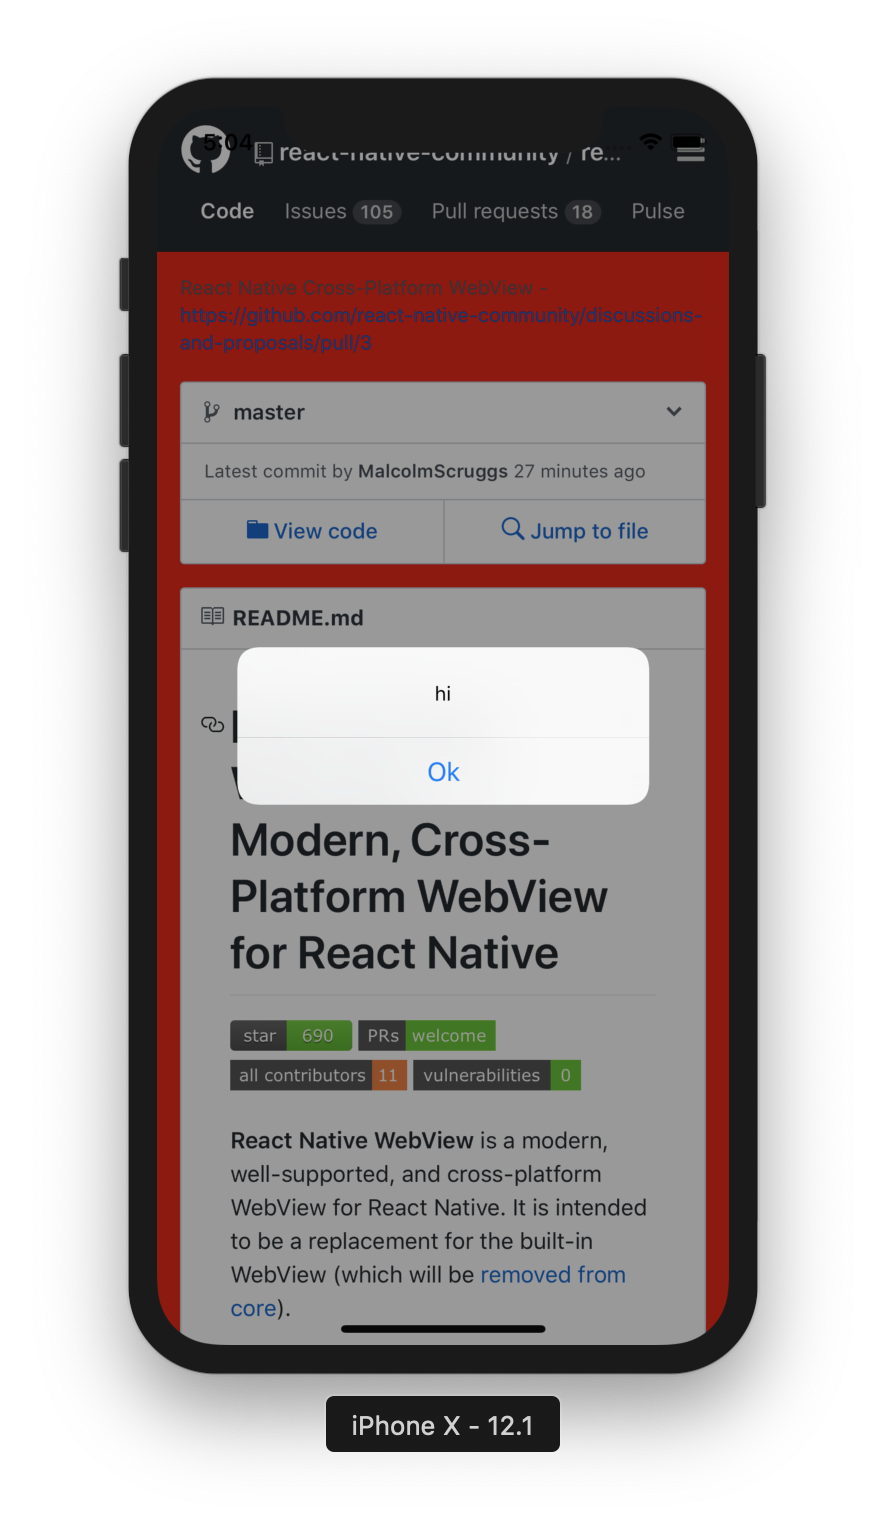
This runs the JavaScript in the runFirst string once the page is loaded. In this case, you can see that both the body style was changed to red and the alert showed up after 2 seconds.
Under the hood
On iOS,
injectedJavaScriptruns a method on WebView calledevaluateJavaScript:completionHandler:On Android,injectedJavaScriptruns a method on the Android WebView calledevaluateJavascriptWithFallback
The injectedJavaScriptBeforeContentLoaded prop
This is a script that runs before the web page loads for the first time. It only runs once, even if the page is reloaded or navigated away. This is useful if you want to inject anything into the window, localstorage, or document prior to the web code executing.
import React, { Component } from 'react';
import { View } from 'react-native';
import { WebView } from 'react-native-webview';

export default class App extends Component {
  render() {
    const runFirst = `
      window.isNativeApp = true;
      true; // note: this is required, or you'll sometimes get silent failures
    `;
    return (
      <View style={{ flex: 1 }}>
        <WebView
          source={{
            uri:
              'https://github.com/react-native-community/react-native-webview',
          }}
          injectedJavaScriptBeforeContentLoaded={runFirst}
        />
      </View>
    );
  }
}
This runs the JavaScript in the runFirst string before the page is loaded. In this case, the value of window.isNativeApp will be set to true before the web code executes.
The injectJavaScript method
While convenient, the downside to the previously mentioned injectedJavaScript prop is that it only runs once. That’s why we also expose a method on the webview ref called injectJavaScript (note the slightly different name!).
import React, { Component } from 'react';
import { View } from 'react-native';
import { WebView } from 'react-native-webview';

export default class App extends Component {
  render() {
    const run = `
      document.body.style.backgroundColor = 'blue';
      true;
    `;

    setTimeout(() => {
      this.webref.injectJavaScript(run);
    }, 3000);

    return (
      <View style={{ flex: 1 }}>
        <WebView
          ref={r => (this.webref = r)}
          source={{
            uri:
              'https://github.com/react-native-community/react-native-webview',
          }}
        />
      </View>
    );
  }
}
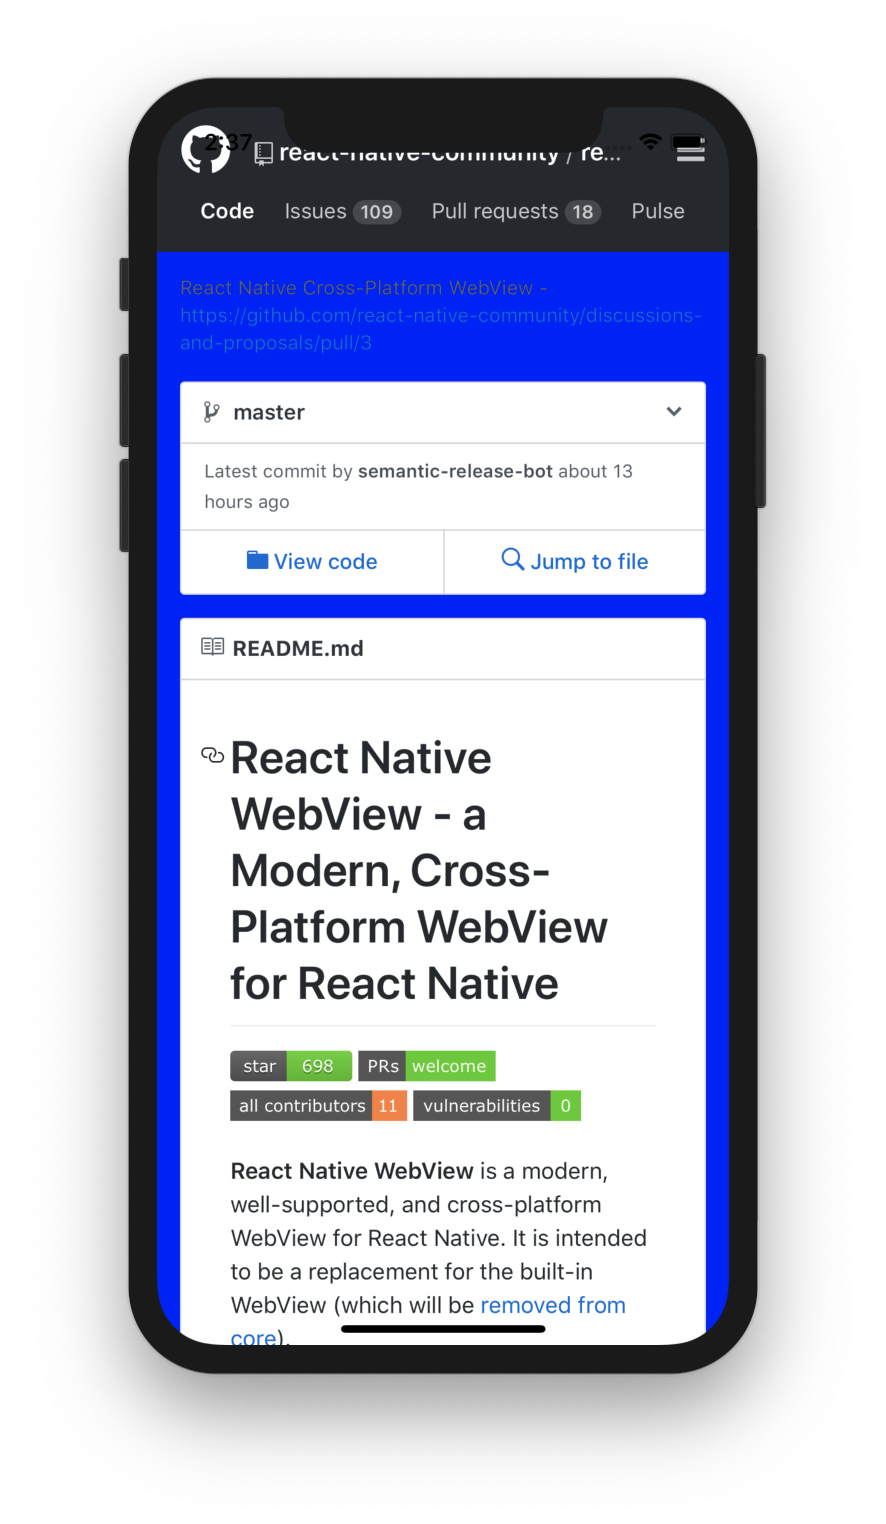
After 3 seconds, this code turns the background blue:
Under the hood
On iOS,
injectJavaScriptcalls WebView’sevaluateJS:andThen:On Android,injectJavaScriptcalls Android WebView’sevaluateJavascriptWithFallbackmethod
The window.ReactNativeWebView.postMessage method and onMessage prop
Being able to send JavaScript to the web page is great, but what about when the web page wants to communicate back to your React Native code? This is where window.ReactNativeWebView.postMessage and the onMessage prop come in.
You must set onMessage or the window.ReactNativeWebView.postMessage method will not be injected into the web page.
window.ReactNativeWebView.postMessage only accepts one argument which must be a string.
import React, { Component } from 'react';
import { View } from 'react-native';
import { WebView } from 'react-native-webview';

export default class App extends Component {
  render() {
    const html = `
      <html>
      <head></head>
      <body>
        <script>
          setTimeout(function () {
            window.ReactNativeWebView.postMessage("Hello!")
          }, 2000)
        </script>
      </body>
      </html>
    `;

    return (
      <View style={{ flex: 1 }}>
        <WebView
          source={{ html }}
          onMessage={event => {
            alert(event.nativeEvent.data);
          }}
        />
      </View>
    );
  }
}
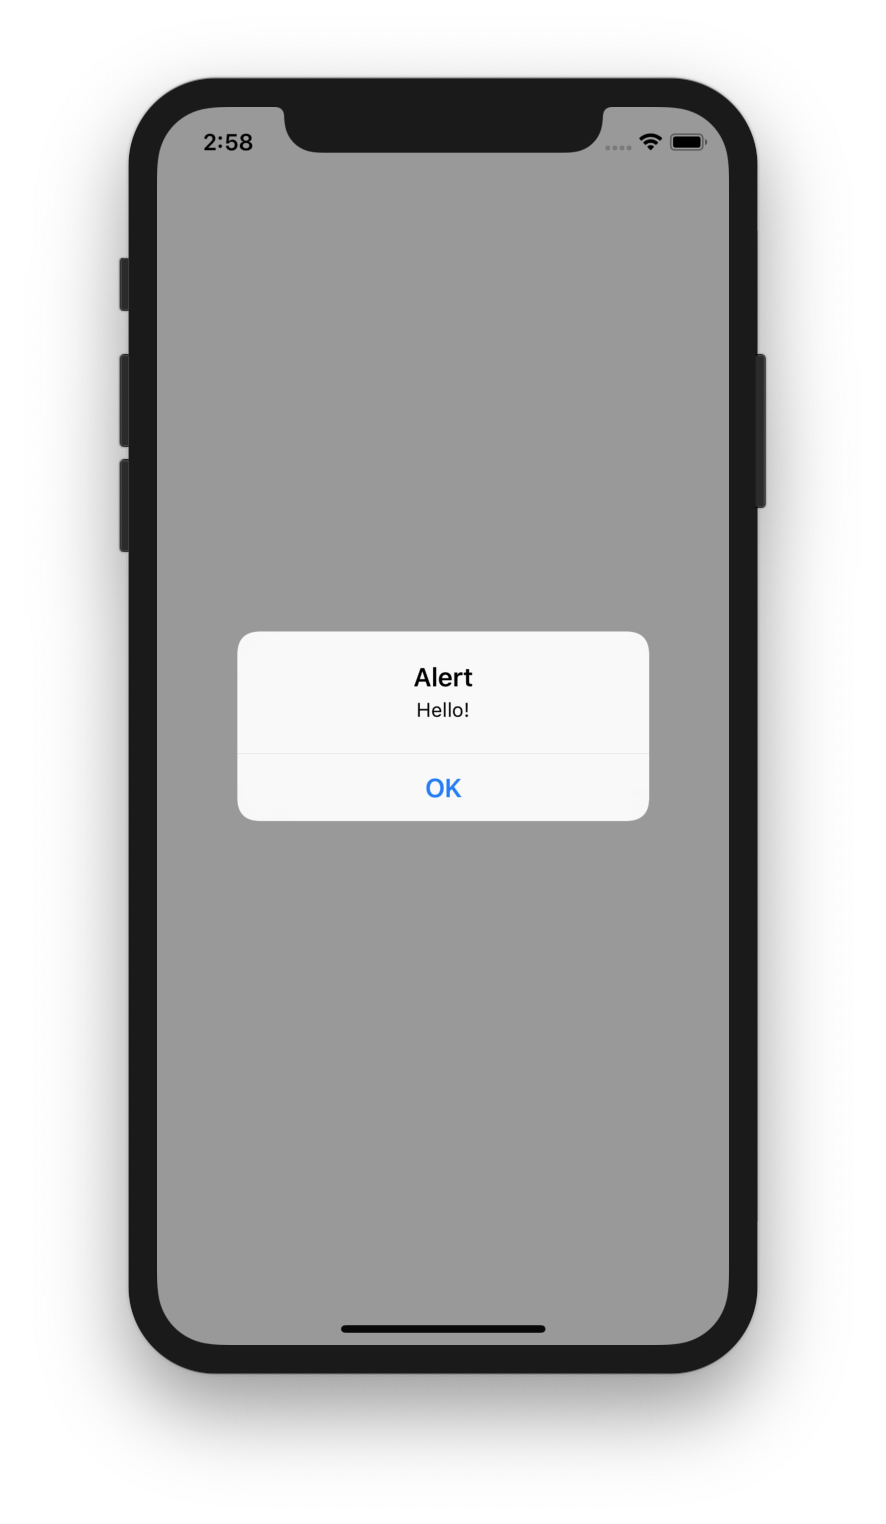
This code will result in this alert:
Working with custom headers, sessions, and cookies
Setting Custom Headers
In React Native WebView, you can set a custom header like this:
<WebView
  source={{
    uri: 'http://example.com',
    headers: {
      'my-custom-header-key': 'my-custom-header-value',
    },
  }}
/>
This will set the header on the first load, but not on subsequent page navigations.
In order to work around this, you can track the current URL, intercept new page loads, and navigate to them yourself (original credit for this technique to Chirag Shah from Big Binary):
const CustomHeaderWebView = props => {
  const { uri, onLoadStart, ...restProps } = props;
  const [currentURI, setURI] = useState(props.source.uri);
  const newSource = { ...props.source, uri: currentURI };

  return (
    <WebView
      {...restProps}
      source={newSource}
      onShouldStartLoadWithRequest={request => {
        // If we're loading the current URI, allow it to load
        if (request.url === currentURI) return true;
        // We're loading a new URL -- change state first
        setURI(request.url);
        return false;
      }}
    />
  );
};

<CustomHeaderWebView
  source={{
    uri: 'http://example.com',
    headers: {
      'my-custom-header-key': 'my-custom-header-value',
    },
  }}
/>;
Managing Cookies
You can set cookies on the React Native side using the @react-native-community/cookies package.
When you do, you’ll likely want to enable the sharedCookiesEnabled prop as well.
const App = () => {
  return (
    <WebView
      source={{ uri: 'http://example.com' }}
      sharedCookiesEnabled={true}
    />
  );
};
If you’d like to send custom cookies in the WebView itself, you can do so in a custom header, like this:
const App = () => {
  return (
    <WebView
      source={{
        uri: 'http://example.com',
        headers: {
          Cookie: 'cookie1=asdf; cookie2=dfasdfdas',
        },
      }}
      sharedCookiesEnabled={true}
    />
  );
};
Note that these cookies will only be sent on the first request unless you use the technique above for setting custom headers on each page load.